Labels

Wednesday, 27 February 2013

Week 23 Croissants

 Time for Yeast goods this week. We made white bread dough, wholemeal bread dough and croissants. With the basic white bread dough, we made some baguettes and some buns in the shapes of knots , hedgehog and 
I totally forgot to take photos during the kneading and shaping process. It was fun to see how the dough proves and become double in size. Then we knocked back the dough and shaped it accordingly and proved it again. Then it went into the hot oven and baked for about 20 minutes. 

The buns were a little over proved as you can see it is rather puffed up that the cuts on the buns were all stretched. We topped one of the hedgehog with poppy seed and another with sesame seed. The rest were just left plain. 

Plain white bread
The next was the wholemeal dough which we used the all in method, where we placed the yeast, flour, salt and water in the bowl and mixed it together. Then we bulk prove the dough until it doubled in size and  knocked it back. Then we divided the dough into 3. One was just baked free form and 2 were baked in the loaf tins. The ones in the loaf tins rose beautifully and had better shape. 


Rustic wholemeal bread
The 2 on the left were ours
The wholemeal bread was quite nice to eat. The texture of the bread was soft and had a nice crust on top. I like the hazelnut that we put in the bread, it gives it a bit more texture. 

Wholemeal Bread
Croissants will be the more challenging one among the 3 that we made. We did the dough the day before and had it resting in the fridge overnight. We didn't want the yeast to activate when making the dough so we kept everything cold. We made 3 single turns and 1 extra double turn. The double turn was not common in croissant recipes. It actually made the croissant a little more like bread texture. It was a little too fluffy and less flaky. I prefer the flaky croissant where there were only 3 single turns. The extra double turn also helps prevent the dough from leaking butter and according to my trainer, people actually prefer the bread like texture more these days. I guess I am more old school so I prefer the classic croissants. 
Croissants
I really enjoyed shaping the croissant, unfortunately I forgot to take any picture of how to roll the croissants. Then we also made Pate Croissant Pain Au Chocolat. We had the our tray further in the oven and the heat was a little hotter on the inside and the Chocolate Pains went a little too dark. We ate it all anyway.


When I tried the white bread at home, I thought.... hmm.... this is quite tasteless and I wondered why. Then I read the recipe again and realised that I forgot to type in "Put in salt" in the recipe! Silly me. Well, I will learn from my silly mistake. 


Saturday, 23 February 2013

Week 22 Petit Fours

Another week of Petit Fours. This time we made Petit Four Frais which means fresh items that can't really be stored for too long. Normally have to be eaten on the same day it is made. We have pecan marzipan in caramel and chocolate. Personally am not a fan of marzipan so I didn't really enjoy eating it but I did enjoy making it. It's a small little cone shape marzipan covered with pecans on the sides and dipped in caramel and chocolate. It looks quite pretty.
Marzipan with pecan
Pecan Marzipan in caramel and chocolate
The next was choux pastry. We have made choux pastry before in our earlier terms but each trainer has his or her own little tricks and we learn a bit more again this time. Because the topic is petit four, we actually made the choux items smaller. We made some Profiteroles which we dipped with caramel and filled with creme chantilly.

Then we made chocolate eclairs which was dipped in chocolate and filled with creme patisserie. Then the last one was the Paris Brest which looks like a donut. This one we had to top with coffee fondant and fill with whipped cream. But our Paris Brest was a little too crisp and it cracked when i tried to cut it open. I was using the serrated knife and was concentrating on not cracking it that I didn't realise that I was sawing my palm. Ha Ha.... yea... I got a cut. So in the end we used some profiterole choux pastry for the coffee fondant topping instead. 


Choux pastry

Caramel Profiteroles
The next item is a lemon meringue tartlet. The base was a sweetcrust pastry which we blind baked and left to cool. Then we filled it with lemon curd and piped italian meringue on top of it. The final touch was to blowtorch it to give it that slight burnt colour. 

The sweetcrust pastry was moulded into the tart cases and chilled in the freezer for about 10minutes before going straight into the oven for a snap bake. This is when the pastry cooks really fast in the hot oven and sets the tart before the butter melts and shrinks the case. It is interesting how we didnt even have to weigh down the tarts and it didn't shrink. 

But our tart cases had a few blisters when it was in the oven. So half way during baking, I took it out and pressed out the air pockets and placed it back into the oven to bake. The air pocket was probably due to not pressing the pastry into the tart cases snugly and some air was caught inside causing it to rise when baked. Luckily it can still be saved. 
Lemon Meringue Tartlets
We made some friands as well. It was a little dry and sweet. It looks good but I didn't really like the taste. Friands are little cakes made with almond meal and egg white and melted butter. I normally make them with some fruits at home and it will be moister and yummier.

All the items are ready with some final touches on the decorations and were presented on a platter. I am happy with today's work. I am starting to enjoy the class a bit more too. There was a bit more cooperation in terms of cleaning up the kitchen this week, which I thought was good.  
Petit Fours Frais


Chocolate Eclairs


Sunday, 17 February 2013

Week 21 Petit Fours

After a long Christmas break, it was a little difficult to bring myself back to my enthusiastic baking mood. Luckily the things we made in the first week were rather interesting. It is called Petit fours which means "little baked items" in French. It is usually enjoyed with a cup of coffee at the end of a meal. 

Traditionally there are 3 main categories of petit fours. Petit Four Sec which means it is dry. It is normally easier to make and has a longer shelf life. We made 3 item that are in this category.

Langues de chat which is also known as Cat's tongue. It is a crispy texture biscuit. It was quite easy to make, the batter is piped into little lines and then designed with zig zags using the same batter but with cocoa powder added into it. The batter spreads and comes out flat. Apparently it looks like a cat's tongue. Hmm..... does it?
Piping Langue De Chat
Next was macarons which is also a Petit Four Sec item but it has a filling between 2 macaron shells. We made the macarons with the French method. I tried the French method before and mine didn't turn out very smooth. So I was quite interested in trying the French method again. The icing sugar and almond meal are sifted together and the egg white is whipped into stiff peaks before the dry ingredients are folded in. The consistency of the batter should look like thick lava. Not too thick and not too runny. The trick is to keep mixing it until when you bang the bowl gently on the table, the batter deflates slightly rather than keeping its shape. 
Macaron shells

As for the filling, we made white chocolate ganache which was infused with orange. The orange flavour was quite nice. Our macarons was slightly browner than what we wanted but it was hardly noticeable. (hehe)
Orange flavoured macarons
Sablé biscuits is another petit four sec that we made. The pastry was very much like a sweetcrust pastry. According to our trainer, the key to a good pastry is to make sure the pastry is well rested in the fridge. Dont overwork the pastry and always keep it cold. I brought a small cookie cutter to make little flowers. Then some we used the fluted tart moulds. The little flowers were sandwiched with some chocolate buttercream and some were sandwiched with white chocolate ganache again and topped with hazelnut.

Sablé cookies
Sablé cookie with hazelnut and buttercream
Then there is another category of petit four which is called the Petit Four Glacé which means it is "iced" with some coating like fondant. We made sponge cake which we then layered with some strawberry jam to about 2cm thick. We made 4 layers and then cut them into cubes about the size of 2.5cm x 2.5cm. Then we wrapped the sponge with some marzipan and then glazed it with fondant coating. 
Layering the sponge cake 
We made some vanilla hazelnut crescents which was a little like shortbread texture. I didn't really like the appearance of the cookie because of the shape and the colour. It looks a little like something that you will find on the ground of some parks. It's the one at the far left of the plate below. 
Plate up petit fours
Overall, I enjoyed making the petit fours. Just didn't like that the class was huge again due to combined class. It was also annoying that some students were irresponsible and left their dishes for other people to clean. This term we have another new trainer, this time it is a guy. He has his way of doing things and I am learning to adapt to his style in the kitchen. I guess it is a good thing that we can have a new trainer, then we can learn different techniques by different professionals. I hope this term goes well. 


I wasn't too happy with how we decorated and presented the petit fours that day because the glacé cake was too plain. It needed some decorations on it. I took my share of the petit fours home and the next morning, I woke up at 5am because I couldn't sleep. As I was tossing and turning in bed, all I can think about was how the petit fours were not complete and needed a slight finishing touch to it. So I got up and melted some chocolate and decorated the cakes and took some photos. 
Chocolate decoration
Ah.... at least now I feel better that the job is done and they look a little prettier. 


Saturday, 2 February 2013

Banana Bread & Foccacia

With my long Christmas break, I have been having some fun in the kitchen. Some of the baking came out good and some were a little disappointing. 


Banana bread, I made this before but it was a little dense according to my dessert critic. So this time, I am trying Peter Reinhart's recipe, except I can't help but reduce the sugar. 

I think it tasted much better than the earlier one that I did. The recipe says to let it rest for an hour before cutting it but there was someone who couldn't wait and had to have a piece. So the first piece looked a little dense. 

The banana bread was nice for a few days. It didn't dry up and it was nice when lightly toasted in the oven and enjoyed with a cup of coffee for breakfast. 

Then one evening I also made garlic and herbs foccacia and we had it hot from the oven with minestrone soup. A nice hot bowl of soup with homemade foccacia. 


Saturday, 26 January 2013

Gateau Napoleon

Recently I have been watching Poh's Kitchen programs on TV and she has this guest chef whom I find very interesting to watch. He is a french patissier who has been living in Australia for a while now. His name is Emmanuel Mollois. His accent is very strong and he has a sense of humour too. But more importantly, the things he bakes and cooks really look scrumptious.

When he made this Gateau Napoleon, my sister said "You have to make this!" and so I did. I followed his recipe which I got from Poh's kitchen website. My gateau didn't look as good as his though. It was a little wonky. He said that this is the traditional version of the vanilla slice that you get today.

First the pastry which was made of butter, flour, egg, salt and cream mixed together and formed into a dough. Then divided into 7 balls and chilled for 2 hours. Then each ball is rolled into thin discs and baked at 230˚C for 10minutes. It was interesting to watch each disc rise so high in the oven. It didn't take long for each disc to bake in the oven but because I baked them one at a time, it took a while to finish all 7 of them.

Dough divided into 7 balls
Crispy layers
 Each of my pastry was a little different in size. Even though I weighted the dough when I divided it, I guess some I rolled slightly thinner than others.

 I am not sure if I was suppose to flatten the pastry before stacking them with pastry cream or leave them tall. Anyway, I left them tall. 

Then I prepared the creme patisserie which was to be filled in between each pastry and stacked them up tall. I only used 6 of the disc for stacking and the last one was crushed up to be used a topping for the outer layer. 

I should have used 2 for the topping because I didnt have enough to cover the whole gateau. The end result was a wonky and rustic gateau napoleon. 


My wonky gateau napoleon
Verdict of the gateau napoleon, everyone said not enough creme patisserie and too much pastry. I think so too. The taste was good but there are a few adjustments that I need to remember to fix for the next time. First of all,definitely more creme patisserie. Secondly, I think the pastry needs to be flipped and baked for a little longer to get the whole thing crispy because the bottom part of my pastry seemed a little soft. Thirdly more crumbs for the outer layer. I know I will try this recipe again and hopefully it will be nicer the next round. 

The layers inside


Thursday, 24 January 2013

Pear and Boysenberry Frangipane Tart

I just learnt how to make frangipane in school and really enjoyed the mini raspberry frangipane tart that we made. I wanted to give it a try and make one big tart at home with the poached pears and boysenberries instead. The boysenberries were frozen ones that I bought from the orchard last month. I thought it will brighten the colour of the tart a little. I hope it is a nice combination in taste as well.

The tart case was not blind baked but instead, it was filled with frangipane and topped with fruits before baking. The leftover trimmings of the pastry dough was not wasted, I made a few roses and leaves to decorate the tart. 
Before baking
 When I filled the frangipane into the tart case, I was wondering if I had enough of the paste as it didn't come up to the top. Then I remembered that it will rise a little when baking so I think it will be alright. And sure enough, after topping with the fruits, it came out looking pretty tall. 
Fresh from the oven.
It took a long time in the oven, almost 55 minutes. I left it in the oven for a few extra minutes to make sure that the centre was cooked. The berries tinted the pears and the whole tart looked a little purplish. I like how the frangipane rose up in between the pears. The sweetcrust was a little dark but most said it was actually nicer because it was crispy. So I am happy with the result of my experiment. 


Saturday, 12 January 2013

Creme Brûlée

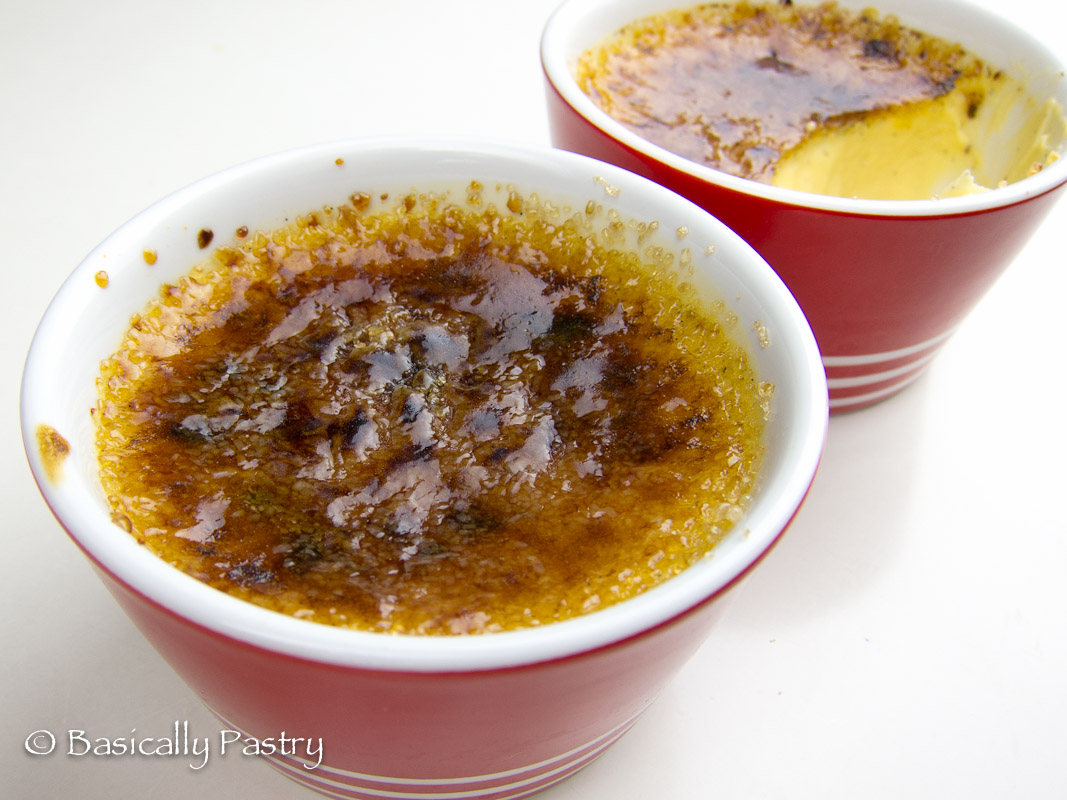
Creme Brûlée has been on my list of things to bake for a while now. The first time I made creme brûlée was in school where it was a no bake creme brûlée. Since then, I have searched for other recipes which were the normal baked creme brûlée and bookmarked one which I thought was good. This is recipe is from George Calombaris from Masterchef Australia.  There is a video where he shows the step by step way of making the creme brûlée which I found was really helpful.


 I bought these ramekins a few months back with the sole intention of making creme brûlée and also invested in a small little blow torch to have a blast with torching the sugar! Then it took me so long to find the butane gas to fill the torch. Finally everything I needed to make creme brûlée were ready. Then they sat in the cupboard waiting to be used for almost a month! hahaha..... 


Finally I did it. Made them one afternoon and had them for dessert after dinner. I was doubtful of the creme brûlée when I took it out from the oven. It looked a little overcooked but the centre was still a little wobbly. I cooled them in the fridge for almost 4hours and then torched the sugar to create the hard sugar layer. Put it back in the fridge for a short while before eating it.


The texture was smooth and taste was not too sweet. I love the little specks of vanilla seeds in the custard. Real vanilla bean is really much nicer than vanilla essence. Then the caramelised sugar layer had the crack sound when I knock the spoon into it. Yum! The recipe was quite simple but I am not sure if it is really easy or I was just lucky. Hopefully next time I make it, it will still be as good as this. So happy!!