Labels

Friday 30 November 2012

Week 16 Hazelnut Mousse Torte

This is more of a demo day than a normal bake till you drop day! 
Our trainer showed us how to make a Linzer Torte. It is an Austrian torte and it is named after the city of Linz. Linzer Torte is apparently the oldest-known recipe in the world, dating back to 1653. It is a crumbly pastry made of flour, butter, eggs, cinnamon , lemon juice and ground nuts and is filled with redcurrant jam. Then covered with a lattice dough strips. The jam that we had wasn't a good one and it was very sweet. I only ate a tiny piece.

Linzer Torte
Pavlovas, something Australians love. It is very sweet obviously because it is made of egg white and a lot of sugar. Unfortunately our pavlovas cracked and they didn't look too nice. But it was so much fun making them. The inside was still soft like marshmallow, like how it is suppose to be. 
Alien look-a-like Pavlovas
Did I mention that our trainer is great with chocolate work and sugar work? well she is and she is so generous with her knowledge. We are so lucky to have her as our trainer for this term but the sad news is she is leaving at the end of the term. Not sure who we will get next. It won't be easy to fill her shoes.

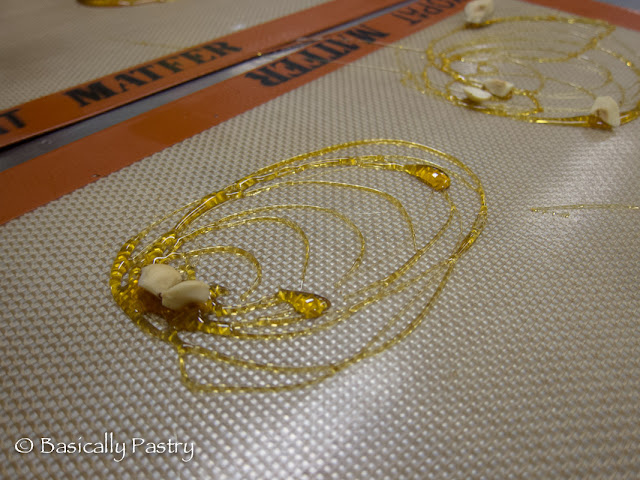
This is a simple sugar work that we got to make to decorate the pavlovas and the torte. Simple and beautiful. 
My sugar work.
Now this is how our trainer dished up the pavlova. A dessert that is colourful , beautiful and has the height. It is almost too beautiful to be eaten.
Trainer's beautifully decorated pavlova.
 Hazelnut mousse torte. This is a layered hazelnut sponge cake with chocolate mousse in between and then covered with hazelnut buttercream. Our torte didn't set in time for us to decorate it because we made a rather big one. So I had to wait till next week.
Trainer's example of how to decorate the torte.
Took the torte home and did my decoration at home. This is how I decorated our torte. No sugar work on mine and no more hazelnuts either so I sprinkled some chocolate chips instead. 
My decoration on the torte.
My teammate who lives really far didn't want to take the cake home because it will melt before she reaches home. Thanks for letting me have the cake. 


Friday 23 November 2012

Macarons to order

A friend of mine ordered a batch of macarons a few weeks back. I was excited about it. I made Lemon Macarons and Strawberry Macarons for him. He ordered a total of 50 macarons. I made the filling a day in advance and then the shells on the next day.

The lemon macarons came out really pretty. Smooth surface and the foot rose up nicely. As for the strawberry macarons, they came out a little small. I think it is because the batter was a little too thick.

I made more than what he ordered , just in case there were any casualty and also so that we have some for ourselves. Pei likes the coffee flavoured macarons, so I made some coffee filling and used the extra pink shells for it. Here are some pictures taken by Pei, my great photographer.

Resting the shells.
Baked shells.
Strawberry Macarons.
Lemon Macarons.
Macarons anyone?
Coffee Macaron.
Origami boxes for my macarons.


Tuesday 20 November 2012

Berry Chocolate Mousse

I made a big batch of sweet crust pastry and kept it in the freezer for whenever I felt like baking something. Then I thawed a batch in the fridge last week, not really sure what I wanted to make. It was sitting in the fridge for a couple of days and I thought I should just bake some tart cases and maybe fill it with créme pâtissière and top it with fresh berries. 

Sweet crust tart cases.
 Then I was flipping the Bourke Street Bakery recipe book and found a chocolate mousse tart recipe which looked quite interesting. The recipe used raspberry puree as the filling but I thought I will make mine a little different, I used frozen mixed berries because that was what I had.
Folding in the whipped cream into the chocolate mixture. 
 The recipe used 55% dark chocolate but I only had 72% dark chocolate, so once again I changed the recipe to suit my kitchen cabinet ingredients. Since I wanted to use frozen berries, I thought I should apply a thin layer of melted chocolate on the surface of the tarts as a protection from the moisture of the berries. The recipe says that the timing was important for making the mousse, so I wrote down every step before I started. 

The chocolate was melted with some cream, the egg yolks were whisked with the sugar over a pot of simmering water, the egg white was whisked to soft peak. The remainder of cream was whipped to soft peak. Then comes the mixing in of ingredients. The warm egg yolk was mixed into the warm chocolate, it has to be warm so that the mix doesn't cease. Then the soft whipped cream and whipped egg white are folded into the chocolate mixture. At this point, you could pour the chocolate mousse into cups and set it in the fridge. For today, I refrigerated it for 4hours before piping into the tart cases. 


Berry Chocolate Mousse Tart.

 I placed some frozen berries into the tart cases before piping the chocolate mousse to cover the berries. I tried a couple of designs, a plain nozzle one as well as a star tip nozzle. Then I also made some chocolate decorations to make it a little prettier. I tried dusting icing sugar on the tart because it looked really brown and dull but the icing sugar melted into the mousse. Haha.... not very smart eh! So I placed a few sprigs of mint leaves to give it some colour. 
Hidden berries.
 For the star rosette tart, I added some fresh strawberries to freshen the look up and it was delicious with the strawberries. The strawberries gave it a little tang and cuts through the rich chocolate flavour. The frozen berries were a bit too frozen when we ate it the first night which wasn't too nice. On the second night, they soften and the flavour had time to mingle in the fridge overnight. The taste and texture were much better the next day. 
Fresh strawberries as garnish.
A piece of tart for you?


Sunday 18 November 2012

Week 15 Cheesecakes

Today's menu is Mango Cheesecake, Blueberry cheesecake and a Zug Kirsch Torte. 
We started with the Mango Cheesecake because it was a no bake cheesecake and it needed to be chilled in the fridge for hours to set. We made 2 small cakes so that we can each take one home and also it will take a shorter time to set. 

My cheesecake didn't look too nice because of a few reasons. Firstly, we were rushing to clean up when I took this photo so I didn't have time to smooth the sides of the cake after removing the acetate strip and the cake ring. Secondly, when I poured the mango jelly on top of the cake, it set really quickly because the gelatine in the jelly set almost immediately when in contact with the cold cheesecake. Lastly, I think it doesn't look nice because I didn't dish it up on a plate. It was still on the baking sheet. Ha Ha. 

No bake mango cheesecake.
Ah.... a slice of mango cheesecake, this photo was taken at home. Now the cheesecake looks a little soft and slightly deflated. I guess it melted a little during transportation. Next time I need to walk faster to get home. But the taste was still pretty good. The base of the cake was a sweet crust pastry. It was a little difficult to cut the cake and not shatter the sweet crust. 

Mango Cheesecake.
Next we made a baked blueberry cheesecake in sweet crust tart cases. We firstly made the sweet crust and blind baked them in the muffin tray. As the tart cases were cooling down, we prepared the cheese filling. The cheese filling had cream cheese and ricotta cheese. It was my first time using ricotta cheese. It made the batter look lumpy and I could still see little bits of the ricotta after folding everything in. I was worried that it will affect the texture of the cheesecake but it turned out pretty nice and smooth. 
Tart cases with frozen berries.
 We placed a couple of frozen blueberries in the tart cases and then poured the cheese mixture into the tart cases. Then we topped it with more blueberries. The berries were not mixed into the batter because we didn't want it to bleed and affect the colour of the cheesecake. 
Baked mini blueberry cheesecake tartlets.
 Oh! Looking at the photo now, I am reminded that we added almond flakes into the sweet crust pastry before baking. It gives it a nice nutty flavour. 


 Last one is Zug Kirsch Torte. It is a layer cake from Switzerland and it consists of layers of nut-meringue, sponge cake and butter cream which is flavoured with Kirsch, which is a type of cherry brandy. Zug is a city located an hour south of Zurich. This cake was invented by Pastry chef Heinrich Höhn in 1921 and has won gold medals in pastry exhibitions in Lucerne in 1923 and 1928. It is layered with pale pink butter cream and topped with glacé cherry and the sides of the cake is covered with roasted flaked almonds.
Japonaise.
 Japonaise is a meringue with the addition of ground nut meal. In this case, we used almond meal. The batter is usually piped onto  a baking sheet and cooked at low temperature to dry out the mix , resulting in a light and crisp, nutty disc which is used as a structural component in a gateau. For today, it is used in the Zug Kirsch Torte. 

Kirsch Torte.
Traditional diamond patterned icing sugar of the Zug Kirsch Torte.
The way we made it was with a thin base of sponge cake and layered with butter cream and the japonaise. I found many pictures of the Kirsch Torte on the internet where the sponge cake layer was in the middle and it was much thicker. The butter cream that was used was just a thin layer. I am not sure which is the right way but I would prefer the thick sponge and less butter cream much more than what we made which was way too heavy for me. 
Layers of the Kirsh Torte.
It is very interesting to be making all these traditional cakes, to know its history and also to see how some recipes have changed to meet the requirements and taste of people today. I wonder if one day I will be able to create something and name it too. Well I still have a lot to learn. 加油!!

Tuesday 13 November 2012

Week 14 Gâteaux

This was one fun day in class. We made 3 cakes and they were all very interesting to make. 
Lets start with the Tropical Gâteau. The base is made out of coconut dacquoise , don't ask me how to pronounce that word. The texture is a little like a meringue, soft on the inside and slightly crisp on the outside. It is made of icing sugar, egg white, almond meal and desiccated coconut. The batter was filled into a piping bag with a plain nozzle and we piped a disc slightly smaller than the size of the cake ring. 

Coconut Dacquiose

The sides of the gateaux were lined with the jaconde that were made last week. This tropical gateau had orange colour jaconde. Then we filled the mousse over the coconut dacquiose and then placed another layer of the coconut dacquiose over the mousse. Again another layer of mousse. Sounds confusing isn't it? 
Lined the sides with jaconde and base with coconut dacquiose
Pouring in the passionfruit mousse.
The last layer on the top was passionfruit jelly. The jelly sets really quick once it is poured on the cold mousse. 
Topped with passionfruit jelly glaze
Took the gateau home and decided to make it a little prettier by adding blueberries and some strawberries. I also dusted it with some icing sugar. 
Additional topping of blueberries and strawberries. 
I left the gateau out too long and it got a little soft. But I wanted to take a photo of the inside to see the layers. You can see the coconut dacquiose at the very bottom, the layers of mousse and then the top of jelly and fruits. 
The inside of the mousse
This following one is the highlight of the day. It's a chocolate mousse gateau. It is called the Belle Heléne. There is a layer of poached pears inside the gâteau. It gives it a nice texture to balance with the smooth mousse. 
Ah... as you can see, the sides of this gâteau is the jaconde from last week, we cut it into strips and lines the inside of the cake ring. Then the bottom layer of the gâteau is a flourless chocolate sponge disc. It is made of mainly eggs and sugar and some cocoa powder. 
There are 2 layers of mousse in this gâteau. It was originally a cinnamon mousse and chocolate mousse but we changed it to vanilla mousse instead of cinnamon. That is because I don't really like cinnamon. 
The best thing about this gâteau is that we used couverture chocolate for the mousse. The taste of the mousse is really good. It is true, if you want a cake to taste good, the ingredients has to be of good quality.
The chocolate jaconde that we made last week.
Belle Heléne Chocolate Mousse.
The chocolate mousse had such strong chocolate flavour that I could hardly taste the vanilla mousse. One good thing was that it was not too sweet. I really enjoyed making and eating this one. 
The inside of the gateau.
We have made Sacher Torte before in Stage 1 but this time we were given a different recipe. It turned out much smoother and moister than the one we did before. This one doesn't have breadcrumbs. The cake was cut in half and apricot jam was sandwiched inside and then a chocolate ganache was poured over it as glaze. The word "Sacher" was written by my teammate with melted chocolate. Then we placed it on top to set. 
Sacher Torte

The class ended rather late and everyone was so tired but I felt really happy because I learnt a lot and all the cakes turned out good. Let's hope Week 15 will be even better. We will be making cheesecakes. Yum!

Monday 12 November 2012

Week 13 Raspberry White Chocolate Gateau

This was a confusing day in class. There were too many people in the class and at times, I didn't even know what I was doing. 
First off we made jaconde, which is actually a component of a cake that we will be baking the following week. 
When I read the recipe the night before class, I couldn't understand how it was made. How did they get the brown stripes to stay separated from the white? The next day, our trainer showed us how it was made. Ah.... seeing how it is done is much better than reading the long winded recipe.
Basically, the brown stripes are made of a paste consisting of equal portions of butter, icing sugar, egg white and flour. In this case, some part of the flour is replaced with cocoa powder in order to get the brown colour. 
It was a thick paste that we then spread on a baking paper and made designs with a comb. 
Then the tray was put in the fridge while we prepare the jaconde batter. The jaconde batter was like a sponge batter really. Then we pour the batter over the brown stripes and tried to spread it evenly. Then it went straight into the oven for only about 7 minutes. 
After that we wrapped it up and froze it for next week. 
Jaconde
The next one was a Raspberry White Chocolate Gateau. Honestly, I don't remember the whole process of making this mousse. I remember that the mousse took a long time to set. I remember we made the chocolate designs with a transfer sheet. The peacock design is actually a piece of transfer sheet, where the white chocolate is poured over it and let to set. Then a plastic layer is removed and the design sticks on the chocolate. 
Raspberry Couli was poured on top of the mousse. 
I wanted to make the sides to have uneven heights of chocolate tiles but it looked better in my imagination than the actual end result. 
Raspberry White Chocolate Mousse Gateau
The last was a citrus bundt cake. I didn't like this cake. It didn't have much lemon flavour to it, the cake was dense and way too sweet. The only lemony flavour that I could get was from the lemon icing that we drizzled on top. 


Overall it wasn't a very good day. The cakes didn't look very nice, didn't taste very nice and I didn't feel like I learnt much.