Labels

Wednesday, 31 July 2013

Week 37 Hot Chocolate Soufflé

OK, this week there are 3 items to prepare, chocolate soufflé, chocolate almond pudding and frangipane tartlets. I organised my time a little better that day, had a workflow plan and decided to keep the plating up simple. 

I brought my own ramekins to school that day hoping that my red ramekins will make it look nicer during presentation. I changed the recipe of the chocolate soufflé a little. (Hehe... don't tell anyone) I added more chocolate and reduced the sugar. Greased the ramekins with butter and cleaned the edges before pouring the soufflé in. Then placed the ramekins in a tray in water bath and baked for 15minutes at 170˚C.

 It was so fun seeing it rise in the oven. But the weird thing was a few minutes before it was ready, the top of the soufflé started to burn a little. I mange to take it out in time before it got too dark. Quickly dusted it with some icing sugar and tah-dah! no one can see the dark top. I only brushed the plate with some chocolate to keep the plating up simple. As the soufflé was a hot dessert, there was not much time to play with presentation because it has to be served as soon as it comes out from the oven. 

Hot Chocolate Soufflé


Chocolate almond pudding was served with caramelised banana and anglaise sauce. I greased the dariole moulds with butter and dusted it with flour before pouring in the batter to bake. Again the puddings were browning too quickly in the oven. What was wrong? I finally knew what went wrong, the oven was set to grill! Oh dear! How did that happen? Well the label on the oven were mostly gone and I must have accidentally turn it to the wrong one. Silly mistake that should never happen again. Luckily it wasn't too burnt and it was still pretty moist on the inside because we had little chocolate pieces in it. 

My lucky day, I got a rectangular plate. Why so happy? Well, there are only 3 of them for the whole class of 12 students and you can only get it if you are early. Well I wasn't the early bird that day but I saw someone took all 3 of them when we only had to plate up 2 desserts, so I asked her to spare me one and she did. 
Chocolate Almond Pudding
Frangipane tartlets were not meant to be plated up that day, it was supposed to be kept in the freezer for the next week when we do dessert trolley. But I was practising my chocolate drawing on a plate and I had a few extra tartlets, so I plated 1 up for fun. I guess I must have had a bit more time than last week.


Frangipane Tartlet
Quite an easy week and I was happy I managed to do everything by myself and wasn't the last to finish. I admit that the plating up was rather simple but we only had chocolates and sugar syrup to decorate with. 

Week 36 Meringue Poached Pear

Ah... End of work experience at Westin and back to school. This week back in school is a little difficult for me. My partner decided to stop at Certificate III which means she is done with the course. She is not coming back to school. It was so different without her.

 Instead of finding a new partner, I decided to do rest of the term by myself. This is also because most in the class already have their usual partners that they work with. 

This week we made Meringue Poached Pear and Chocolate Orange Crême Brûleé. Together with these, we had to make spun sugar, chocolate filigree and tuile biscuits as garnishes. 

I had thought of plating up the meringue on a rectangular base rather than a round case. So I baked some round cases and 2 rectangular bases.

Meringue
The chocolate orange creme brulee was rather interesting. It had orange segments inside the ramekin and on top of the chocolate custard, it had a foamy créme de cacao sabayon poured on right before serving. I don't know why it is called a brûleé when there was no burning of any sugar on the top. The taste was quite nice because it wasn't too sweet. 
Chocolate & Orange Crême Brûleé
I made some templates for the tuile biscuits with a thick paper. I made some leaves, bees , shapes, forks and spoons. It was fun shaping the biscuit when it came out from the oven. I placed the biscuits on a rolling pin that was sprayed with oil to make sure it doesn't stick. It gave it a nice curl when it cools down. 
Tuile biscuits
My spun sugar was not good. I was disappointed that it was not as good as the last time I made it. Anyway I made some balls and some just a ring. Then I made some chocolate shapes, I wanted to make a cylinder shape chocolate with horizontal lines but I can't seem to join the ends and keep it in place. In the end, I made a tear drop shape case. 

Both the dessert didn't look like how I imagined or how I planned it to be. First I couldn't get the small rectangular plate and then suddenly I was given a huge square plate to plate up a small crême brûleé. So since nothing came out how I wanted it to, I had to quickly see how I can plate it up with what I had. 

I placed the spun sugar ring on the ramekin with a tuile biscuit sitting inside it. Had the chocolate tear drop case at the other corner filled with fresh fruits. Then I wanted to have a light dust of cocoa powder on one corner but because the sieve had too big holes, the cocoa just came out looking messy. So I placed a small fork shape tuile biscuit on top of it. 
Sigh... not happy with the presentation of this dessert. 
Chocolate & Orange Crême Brûleé 

For the meringue poached pear, I initially wanted to plate up with the rectangular meringue and top it with the sliced poached pear. But the chantilly cream was too soft to hold the pear and the pear was too slippery to sit on the cream. So I ended up using the round case and filled it with chantilly cream and placed the pear on it. It looked dull and plain because everything was white and yellowy. I tried to inject some colour in by placing some strawberries and orange segments on the side and had some chantilly cream and tuile biscuits as part of the decoration. Hoping that it will make it less ugly. 


Meringue Poached Pear
Overall it was not a good day for me. I didn't like both the desserts that I made. I think I was a little nervous when I saw how fast everyone was and I only had myself to do all the work.  I wonder how I am going to go through the rest of the term working by myself. I miss working with my partner. Hopefully next week I will be more organised and work better alone. 

Thursday, 25 July 2013

Westin Week 3

Last week at Westin, I had a lot more to do this week. I stayed back a few more hours to help the chef. She was very nice and entrusted me with a lot of tasks that last week. 
I was lucky because it was the end of Autumn season for high tea, so I had the opportunity to see the new menu for the Winter high tea. It was the transition from Autumn to Winter where the cookies changed from autumn leaves to winter snowflakes.
 I started rolling out the pastry and cutting out the snowflake cookies. I made at least 300 pieces of the snowflake cookies and then baked them 6 trays at a time for about 15minutes. Then left it to cool for the next stage of covering the fondant.


Snowflake cookies
Baked snowflake cookies
Marble bench top 
I had to make about 100 pieces of the autumn leaf cookies to cater for the last days of autumn. I had fun mixing the red and yellow fondant to make a marble effect and got a very nice autumn colour. Placed the fondant on the baked cookie with maple syrup as the glue. Then piped some green icing sugar and dusted it with coloured sugar. 
Mixing colours
Autumn leaves
More autumn leaves
I made a tray of banana and pecan muffins, blueberry and lemon muffins , raspberry and white chocolate muffins. Then I sandwiched about 40 croissants with ham, cheese and tomatoes. Another 60 lemon meringue pie shots were made and kept in the fridge. Next was dipping the macarons in chocolate and topped with hazelnuts. 
Muffins
Croissants
Preparing Lemon Meringue Pie Shots
Lemon Meringue Pie Shots
Chocolate hazelnut macarons
More fruit tarts
Heavy duty stand mixer
Now I get to continue with the snowflake cookies. Since it is a snowflake, the fondant was just plain white and the icing was a very sweet light sky blue. Then a edible pearl was placed in the centre and some silver sparkling dust was sprinkled over it. It looks so pretty and it really represents winter. 

Snowflake Cookies

Some of the proposed winter high tea items for the menu
This is the final look of the Winter high tea. There are scones on the top tray with whipped cream and raspberry jam. The centre tray has the savoury snacks and the last tray has the cookies, strawberry shortcakes, puddings, chocolates and a chestnut brûlée. 

Wow! I am so happy with my experience at Westin. Even though it was really tiring at the end of the shift, I learnt a lot there. I did so many desserts in huge quantities, seen how real kitchen operates, use some of the heavy duty equipment and experienced the busy schedule in a hotel kitchen. Thank you chef for sharing your knowledge and for giving me so much opportunities to learn. 


Winter High Tea


Westin Week 2

Hmm.. I am still weeks behind on my post. Let's try to catch up. Second week at Westin was not as much fun because I had to help out more in the commercial kitchen rather than the pastry kitchen. But I did learn how to crack 500 eggs quickly with both hands. It was actually quite fun! 

With the limited time that I had in the pastry kitchen that week, I helped made fruit skewers for a function.

I helped prepare the yoghurt with muesli and fruit compote. Then made a watermelon and lychee shot in martini glasses. Mostly just cutting fruits and placing them into the glasses. The glasses made the desserts look extra yummy. Presentation is very important when it comes to dessert. 


And of course more mini fruit tarts with mascarpone cheese filling. I think I made a few hundreds of these fruit tarts. 

Wednesday, 24 July 2013

Transformer Cake

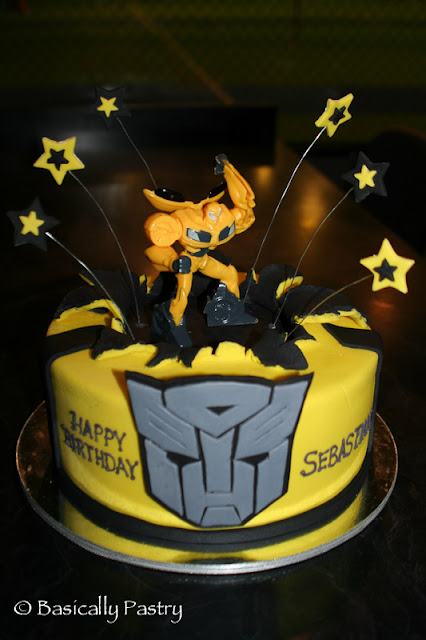
 This is the Transformer cake that had to be ready the same time as Fireman Sam. Sebastian is turning 6 and he loves Transformer. His mummy was contemplating between  Bumblebee or Optimus Prime. I guess he must like them both! In the end she wanted a simple round cake with bumblebee toy on the cake. 

Again with the power of internet, I found so many Transformer cakes that were so beautiful and showed her a few that I thought was simple but still had an impact, rather than just a round cake with Bumblebee toy on top. 

She liked the one where the cake was exploding in the centre with the toy standing in the middle. I was happy with that too because I thought it was cool. Now we have decided on which design to do, my planning starts on how to make it! It looks simple but how do I get the base of the explosion to have black? how do I get the back on the inside of the yellow for the exploding part? 
Exploding stars
Anyway, started with what I thought was the easier bits. I made the stars. It was simple but wire is not exactly food safe product and I do not want to stick the wire into the cake. How do I do this? Not that simple now.
Transformer logo
I had to get the template of the logo before I can cut the fondant. Andrew helped me print out a few sizes of the logo to choose from. There were some logos of Decepticon too but I stayed with the good guys! I wanted the logo to have a base to sit on before going on to the cake. It looks more dramatic with the black base. I then placed it on the side of the cake tin to get the curve. Logo done. It took quite long to get the logo done because of all the fine lines. I was so sad to see a little crack on his face but I didn't want to spend another 3 to 4 hours on the logo. Hopefully not many noticed it.
First thin layer of fondant on the surface
I read a few blogs and found out how they did the base to have the black. First I placed a thin layer of black on the cake surface. Then I placed another round thin layer of black on the back of the yellow fondant before covering the cake as normal. But I had to make sure both black fondant are aligned. Then carefully cut the top layer with a scissors to make the explosion. I was a little nervous at this point. But I got it! I wished I had the yellow fondant a little thinner, it would make the finish much finer. I had the flaps of the explosion to rest on some rolled up cling wrap to set in place. 
Logo on the cake
Then I did the bottom edge with black and positioned the logo on the front of the cake. Then I did the black stripes. This part was a little stress free. But then I had to write happy birthday on the cake. I have shaky hands and I was a little scared that my bad piping skills will ruin the cake. So, the stress is back. I held my breath and did it!! I think it looks ok. Of course it can be better. 
Royal icing piping
Setting the cake
Sticking in the stars
Ah, the part about the stars in wire. Well,most bloggers say, stick the wire in but not all the way to the cake but I was still uncomfortable with that idea because people are still going to eat the fondant part where the wires were in. So more research, found one that says stick the wire in straws and push the straw into the cake. Good idea but I dont want straw because straws are too big so I thought of lollipop sticks! I cut the lollipop sticks to 2cm length. then filled it with royal icing and stuck the end of the wire into it to set. Then just stick the part with the lollipop stick into the cake. That way, the wire doesn't touch the cake! Ha Ha Ha! So happy!! It worked! 


I put 6 stars on the cake because Sebastian is 6. I didn't have the toy with me so I had to guess the height of the toy based on what Sebastian's mummy told me. 


Ready for delivery
All set and ready to be delivered. It sits cosily in the tailor made box. (Thanks again my box engineer,  Andrew). I hope Sebastian likes the cake. I guess he will super excited to see the toy first! 

Below are photos that I got from Sebastian's mummy. Well the toy is a little smaller than I thought it would be. Luckily his hand was up, gave him a little height! haha. 


Sebastian and friends
Sebastian and brother Lachlan
Happy Birthday Sebastian
I am so happy that I managed to deliver both the cakes on time and both parents were happy with the cakes. This transformer cake seems simple but it had so many little things that I didn't expect in the beginning. I am happy that it all turned out ok. I want to thank Sebastian's parents for the opportunity to make the cake! It was challenging and also lots of fun.