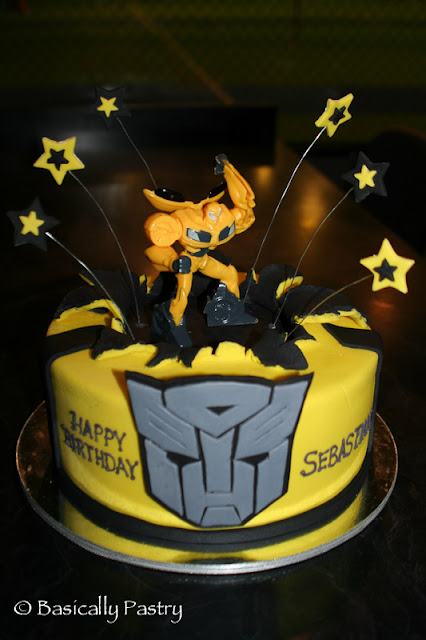
Again with the power of internet, I found so many Transformer cakes that were so beautiful and showed her a few that I thought was simple but still had an impact, rather than just a round cake with Bumblebee toy on top.
She liked the one where the cake was exploding in the centre with the toy standing in the middle. I was happy with that too because I thought it was cool. Now we have decided on which design to do, my planning starts on how to make it! It looks simple but how do I get the base of the explosion to have black? how do I get the back on the inside of the yellow for the exploding part?
 |
| Exploding stars |
Anyway, started with what I thought was the easier bits. I made the stars. It was simple but wire is not exactly food safe product and I do not want to stick the wire into the cake. How do I do this? Not that simple now.
 |
| Transformer logo |
I had to get the template of the logo before I can cut the fondant. Andrew helped me print out a few sizes of the logo to choose from. There were some logos of Decepticon too but I stayed with the good guys! I wanted the logo to have a base to sit on before going on to the cake. It looks more dramatic with the black base. I then placed it on the side of the cake tin to get the curve. Logo done. It took quite long to get the logo done because of all the fine lines. I was so sad to see a little crack on his face but I didn't want to spend another 3 to 4 hours on the logo. Hopefully not many noticed it.
 |
| First thin layer of fondant on the surface |
I read a few blogs and found out how they did the base to have the black. First I placed a thin layer of black on the cake surface. Then I placed another round thin layer of black on the back of the yellow fondant before covering the cake as normal. But I had to make sure both black fondant are aligned. Then carefully cut the top layer with a scissors to make the explosion. I was a little nervous at this point. But I got it! I wished I had the yellow fondant a little thinner, it would make the finish much finer. I had the flaps of the explosion to rest on some rolled up cling wrap to set in place.
 |
| Logo on the cake |
Then I did the bottom edge with black and positioned the logo on the front of the cake. Then I did the black stripes. This part was a little stress free. But then I had to write happy birthday on the cake. I have shaky hands and I was a little scared that my bad piping skills will ruin the cake. So, the stress is back. I held my breath and did it!! I think it looks ok. Of course it can be better.
 |
| Royal icing piping |
 |
| Setting the cake |
 |
| Sticking in the stars |
Ah, the part about the stars in wire. Well,most bloggers say, stick the wire in but not all the way to the cake but I was still uncomfortable with that idea because people are still going to eat the fondant part where the wires were in. So more research, found one that says stick the wire in straws and push the straw into the cake. Good idea but I dont want straw because straws are too big so I thought of lollipop sticks! I cut the lollipop sticks to 2cm length. then filled it with royal icing and stuck the end of the wire into it to set. Then just stick the part with the lollipop stick into the cake. That way, the wire doesn't touch the cake! Ha Ha Ha! So happy!! It worked!
I put 6 stars on the cake because Sebastian is 6. I didn't have the toy with me so I had to guess the height of the toy based on what Sebastian's mummy told me.
 |
| Ready for delivery |
All set and ready to be delivered. It sits cosily in the tailor made box. (Thanks again my box engineer, Andrew). I hope Sebastian likes the cake. I guess he will super excited to see the toy first!
Below are photos that I got from Sebastian's mummy. Well the toy is a little smaller than I thought it would be. Luckily his hand was up, gave him a little height! haha.
 |
| Sebastian and friends |
 |
| Sebastian and brother Lachlan |
 |
| Happy Birthday Sebastian |
I am so happy that I managed to deliver both the cakes on time and both parents were happy with the cakes. This transformer cake seems simple but it had so many little things that I didn't expect in the beginning. I am happy that it all turned out ok. I want to thank Sebastian's parents for the opportunity to make the cake! It was challenging and also lots of fun.


I like Sebastian's expression!! haha worth for all the hard work. Enjoyed reading this post, especially the 'repairing' part! chigek!
ReplyDeleteMing
Yea he is cute..... haha it was chigek indeed.
Delete